Inventory: Difference between revisions
Jump to navigation
Jump to search
No edit summary |
No edit summary |
||
| Line 1: | Line 1: | ||
[[Category:Reference Guide]] | [[Category:Reference Guide]] | ||
[[File:inventory.png]] | [[File:inventory.png]] | ||
==Equipment Slots== | |||
{| | {| | ||
|- | |- | ||
| Line 22: | Line 21: | ||
[[#Additional equipment|Additional Equipment]] | [[#Additional equipment|Additional Equipment]] | ||
|} | |} | ||
===Equipment=== | |||
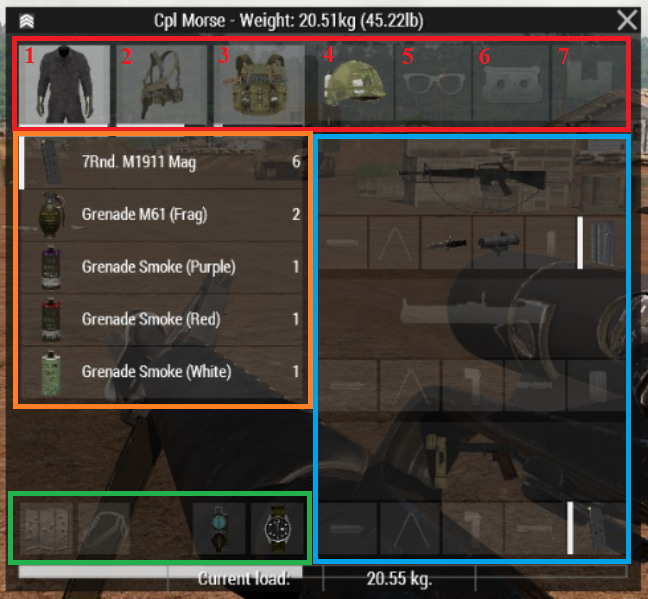
There are three load carrying areas of your inventory ('''I''') displayed top left; | There are three load carrying areas of your inventory ('''I''') displayed top left; | ||
*Uniform | *Uniform | ||
| Line 43: | Line 42: | ||
|} | |} | ||
===Weapons=== | |||
===Additional Equipment=== | |||
Revision as of 18:44, 15 September 2025
Equipment Slots
Equipment
There are three load carrying areas of your inventory (I) displayed top left;
- Uniform
- Vest
- Backpack
Items can be moved between these if required. The white bar under each shows how much of its capacity is full.
Left Click and Hold on the item, and anywhere there is space to put it will go white. Anywhere there isn’t, will go red.
Drag it over to where you want to put it in the slot and Let Go
| File:Ammomag.png | In the example left, an ammo mag has been selected in the vest location.
There is no room for it in the Uniform, but there is in the backpack The orange bar under the vest shows how much space there will be once the item is moved, and the orange bar under the backpack shows how much will be added. |

